
NestJS에서는 HTTP 요청과 응답을 처리하기 위한 다양한 데코레이터와 기능을 제공한다. 이를 통해 클라이언트의 요청을 효과적으로 처리하고, 적절한 응답을 반환할 수 있다.
HTTP 통신의 기본 구조
Request 구조
요청은 크게 Start Line, Headers, Body로 구성된다.
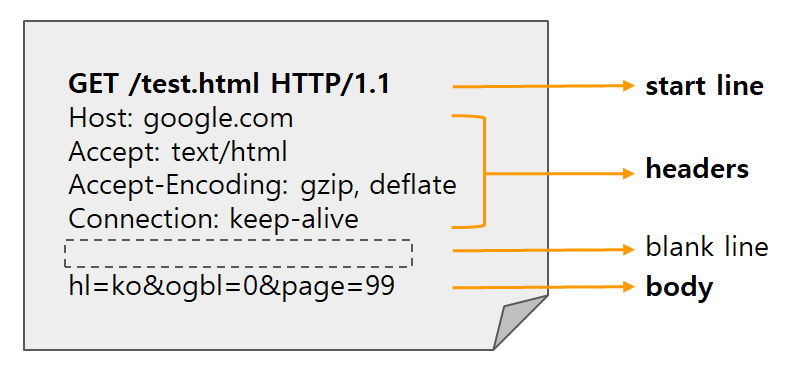
1. Start Line
- HTTP Method (GET, POST, PUT, DELETE 등)
- Request Target (URL)
- HTTP Version
2. Headers
- Host: 요청하는 서버의 도메인 정보
- User-Agent: 클라이언트 애플리케이션 정보
- Accept: 클라이언트가 받을 수 있는 컨텐츠 타입
- Authorization: 인증 관련 정보 (e.g., Bearer JWT Token)
- Content-Type: 요청 본문의 타입 (e.g., application/json)
3. Body
- POST나 PUT 요청에서 서버로 전송하는 데이터
Response 구조
응답은 Status Line, Headers, Body로 구성된다.
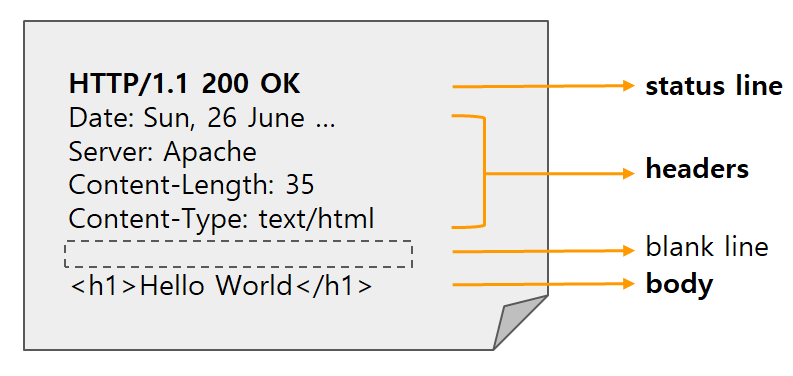
1. Status Line
- HTTP Version
- Status Code (200, 404, 500 등)
- Status Text (OK, Not Found 등)
2. Headers
- Content-Type: 응답 본문의 타입
- Set-Cookie: 클라이언트에 쿠키 설정
- Cache-Control: 캐싱 정책
3. Body
- 서버가 클라이언트에게 전송하는 실제 데이터
Request 처리
요청 파라미터 처리
NestJS에서는 @Param과 @Query 데코레이터를 통해 URL 파라미터와 쿼리 파라미터를 처리할 수 있다.
@Controller('users')
export class UsersController {
  @Get(':id')
  findOne(@Param('id') id: string) {
    return `User ID: ${id}`;
  }

  @Get()
  findAll(@Query('page') page: number, @Query('limit') limit: number) {
    return `Page: ${page}, Limit: ${limit}`;
  }
}
요청 본문(Body) 처리
요청 본문은 @Body 데코레이터를 사용하여 DTO 형태로 처리한다.
// user.dto.ts
export class CreateUserDto {
  readonly email: string;
  readonly password: string;
}

// users.controller.ts
@Controller('users')
export class UsersController {
  @Post('signup')
  async signup(@Body() createUserDto: CreateUserDto) {
    return this.usersService.create(createUserDto);
  }
}
헤더와 쿠키 활용
@Headers와 @Cookies를 사용하면 요청의 헤더와 쿠키를 쉽게 가져올 수 있다.
@Controller('auth')
export class AuthController {
  @Post('login')
  async login(
    @Body() loginDto: LoginDto,
    @Res({ passthrough: true }) response: Response
  ) {
    const { accessToken } = await this.authService.login(loginDto);

    response.cookie('jwt', accessToken, {
      httpOnly: true,
      secure: process.env.NODE_ENV === 'production',
      maxAge: 24 * 60 * 60 * 1000,
    });

    return { message: 'Login successful' };
  }

  @Get('profile')
  getProfile(@Cookies('jwt') jwt: string) {
    return this.authService.verifyToken(jwt);
  }
}
Response 처리
기본 응답과 상태 코드
응답 상태 코드는 @HttpCode 데코레이터를 사용해 지정할 수 있다.
@Controller('items')
export class ItemsController {
  @Get()
  findAll() {
    return ['item1', 'item2'];
  }

  @Post()
  @HttpCode(201)
  create() {
    return 'Item created';
  }
}
응답 헤더 설정
@Header 데코레이터를 사용하면 응답 헤더를 설정할 수 있다.
@Controller('files')
export class FilesController {
  @Get('download')
  @Header('Content-Type', 'application/pdf')
  @Header('Content-Disposition', 'attachment; filename="file.pdf"')
  download() {
    return 'file content';
  }
}
리디렉션
@Redirect 데코레이터를 사용하면 요청을 다른 URL로 리디렉션할 수 있다.
@Controller('auth')
export class AuthController {
  @Get('login')
  @Redirect('https://nullisdefined.site/devlog', 301)
  handleLogin() {
  }

  @Get('redirect')
  @Redirect()
  dynamicRedirect() {
    return {
      url: 'https://nullisdefined.site/devlog',
      statusCode: 302
    };
  }
}
마치며
NestJS는 Express를 기반으로 설계되었지만, 데코레이터를 활용한 선언적 프로그래밍 방식을 제공한다. 이를 통해 HTTP 요청과 응답 처리를 보다 명확하고 간결하게 작성할 수 있다.
요청 파라미터, 본문, 헤더, 쿠키 등 다양한 데이터를 처리하는 방법을 직관적으로 제공하며, 상태 코드나 응답 헤더 설정, 리디렉션과 같은 응답 처리 또한 쉽게 구현할 수 있다.