정적인 포트폴리오 페이지에 조금 인터랙티브한 애니메이션을 추가해 보았다. 특히 스크롤 기반 네비게이션과 3D 프로젝트 캐러셀 구현에 중점을 두었다.
왜 애니메이션인가?
포트폴리오는 개발자의 첫인상을 결정하는 중요한 요소다. 단순히 정보를 나열하는 것보다 사용자와 상호작용하는 동적인 경험을 제공하고 싶었다. 잘 만들어진 애니메이션은:
- 자연스러운 전환으로 사용자의 인지적 부담을 줄인다
- 중요한 콘텐츠에 시선을 집중시킨다
- 전문성과 디테일에 대한 관심을 보여준다
- 사용자 행동에 즉각적인 피드백을 제공한다
스크롤 기반 섹션 네비게이션
1. 스크롤 인터셉션 구현
가장 먼저 구현한 것은 히어로 섹션에서 스크롤할 때 자동으로 프로젝트 섹션으로 이동하는 기능이다.
import { useEffect, useRef, useState } from "react";

export function useScrollNavigation() {
  const [isScrolling, setIsScrolling] = useState(false);
  const scrollTimeoutRef = useRef<NodeJS.Timeout | null>(null);
  const heroRef = useRef<HTMLElement>(null);
  const projectsRef = useRef<HTMLElement>(null);

  // 현재 히어로 섹션에 있는지 확인
  const isInHeroSection = () => {
    if (!heroRef.current) return false;
    const rect = heroRef.current.getBoundingClientRect();
    return rect.top <= 100 && rect.bottom > 100;
  };

  // 프로젝트 섹션으로 스크롤
  const scrollToProjects = () => {
    if (projectsRef.current && !isScrolling) {
      setIsScrolling(true);
      projectsRef.current.scrollIntoView({
        behavior: "smooth",
        block: "start",
      });

      setTimeout(() => {
        setIsScrolling(false);
      }, 1000);
    }
  };

  // 히어로 섹션으로 스크롤
  const scrollToHero = () => {
    if (heroRef.current && !isScrolling) {
      setIsScrolling(true);
      heroRef.current.scrollIntoView({
        behavior: "smooth",
        block: "start",
      });

      setTimeout(() => {
        setIsScrolling(false);
      }, 1000);
    }
  };

  // 휠 이벤트 핸들러
  useEffect(() => {
    const handleWheel = (e: WheelEvent) => {
      if (isScrolling) return;

      const inHero = isInHeroSection();

      // 히어로 섹션에서 아래로 스크롤
      if (inHero && e.deltaY > 0) {
        e.preventDefault();

        // 디바운싱 처리
        if (scrollTimeoutRef.current) {
          clearTimeout(scrollTimeoutRef.current);
        }

        scrollTimeoutRef.current = setTimeout(() => {
          scrollToProjects();
        }, 50);
      }
      // 프로젝트 섹션 상단에서 위로 스크롤
      else if (!inHero && e.deltaY < 0) {
        const projectsElement = projectsRef.current;
        if (projectsElement) {
          const projectsRect = projectsElement.getBoundingClientRect();
          const isNearProjectsTop =
            projectsRect.top >= -200 && projectsRect.top <= 200;

          if (isNearProjectsTop) {
            e.preventDefault();
            scrollToHero();
          }
        }
      }
    };

    window.addEventListener("wheel", handleWheel, { passive: false });

    return () => {
      window.removeEventListener("wheel", handleWheel);
      if (scrollTimeoutRef.current) {
        clearTimeout(scrollTimeoutRef.current);
      }
    };
  }, [isScrolling]);

  // 터치 이벤트 처리
  useEffect(() => {
    let startY = 0;
    let endY = 0;

    const handleTouchStart = (e: TouchEvent) => {
      startY = e.touches[0].clientY;
    };

    const handleTouchEnd = (e: TouchEvent) => {
      if (isScrolling) return;

      endY = e.changedTouches[0].clientY;
      const deltaY = startY - endY;
      const inHero = isInHeroSection();

      // 최소 스와이프 거리 50px
      if (Math.abs(deltaY) > 50) {
        if (inHero && deltaY > 0) {
          scrollToProjects();
        } else if (!inHero && deltaY < 0) {
          const projectsElement = projectsRef.current;
          if (projectsElement) {
            const projectsRect = projectsElement.getBoundingClientRect();
            const isNearProjectsTop = projectsRect.top >= -200 && projectsRect.top <= 200;

            if (isNearProjectsTop) {
              scrollToHero();
            }
          }
        }
      }
    };

    window.addEventListener("touchstart", handleTouchStart, { passive: true });
    window.addEventListener("touchend", handleTouchEnd, { passive: true });

    return () => {
      window.removeEventListener("touchstart", handleTouchStart);
      window.removeEventListener("touchend", handleTouchEnd);
    };
  }, [isScrolling]);

  return {
    heroRef,
    projectsRef,
    isScrolling,
    scrollToProjects,
    scrollToHero,
  };
}
2. 스크롤 상태 관리
스크롤 중복 실행을 방지하고 부드러운 전환을 위해 상태 관리가 중요했다. isScrolling 플래그로 애니메이션 중 추가 스크롤을 차단하고, 디바운싱으로 과도한 이벤트 호출을 방지했다.
3D 프로젝트 캐러셀 구현
1. 반응형 캐러셀 컴포넌트
데스크톱에서는 3개의 카드를 동시에 보여주고, 모바일에서는 단일 카드로 전환되는 반응형 캐러셀을 구현했다.
import React, { useState, useEffect } from "react";
import { ChevronLeft, ChevronRight } from "lucide-react";

interface Project {
  id: number;
  title: string;
  description: string;
  image: string;
  technologies: string[];
  githubUrl?: string;
  liveUrl?: string;
}

interface ProjectCarouselProps {
  projects: Project[];
  onImageClick: (image: string) => void;
}

export default function ProjectCarousel({ projects, onImageClick }: ProjectCarouselProps) {
  const [currentProjectIndex, setCurrentProjectIndex] = useState(0);

  // 프로젝트 네비게이션
  const nextProject = () => {
    setCurrentProjectIndex((prev) => (prev + 1) % projects.length);
  };

  const prevProject = () => {
    setCurrentProjectIndex((prev) =>
      prev === 0 ? projects.length - 1 : prev - 1
    );
  };

  // 키보드 네비게이션
  useEffect(() => {
    const handleKeyPress = (e: KeyboardEvent) => {
      if (e.key === "ArrowLeft") {
        prevProject();
      } else if (e.key === "ArrowRight") {
        nextProject();
      }
    };

    window.addEventListener("keydown", handleKeyPress);
    return () => window.removeEventListener("keydown", handleKeyPress);
  }, []);

  // 인디케이터 컴포넌트
  const Indicators = () => (
    <div className="flex justify-center mt-8 space-x-2 mb-1">
      {projects.map((_, index) => (
        <button
          key={index}
          onClick={() => setCurrentProjectIndex(index)}
          className={`w-2.5 h-2.5 rounded-full transition-all duration-300 ${
            index === currentProjectIndex
              ? "bg-blue-500 scale-125 shadow-md"
              : "bg-gray-300 dark:bg-gray-600 hover:bg-gray-400 hover:scale-110"
          }`}
          aria-label={`Go to project ${index + 1}`}
        />
      ))}
    </div>
  );

  return (
    <div className="w-full">
      {/* 데스크톱용 3카드 캐러셀 */}
      <div className="hidden lg:flex items-center justify-center gap-4 lg:gap-6">
        {/* 이전 프로젝트 카드 (왼쪽) */}
        <div
          className="w-72 lg:w-80 flex-shrink-0 transform scale-75 lg:scale-80
                     opacity-60 hover:opacity-80 transition-all duration-500
                     cursor-pointer"
          onClick={prevProject}
          role="button"
          aria-label="Previous project"
        >
          <ProjectCard
            project={projects[(currentProjectIndex - 1 + projects.length) % projects.length]}
            isActive={false}
            onImageClick={() => {}}
          />
        </div>

        {/* 현재 프로젝트 카드 (중앙) */}
        <div className="w-72 lg:w-[22rem] flex-shrink-0 transform scale-100
                       z-10 shadow-xl">
          <ProjectCard
            project={projects[currentProjectIndex]}
            isActive={true}
            onImageClick={onImageClick}
          />
        </div>

        {/* 다음 프로젝트 카드 (오른쪽) */}
        <div
          className="w-72 lg:w-80 flex-shrink-0 transform scale-75 lg:scale-80
                     opacity-60 hover:opacity-80 transition-all duration-500
                     cursor-pointer"
          onClick={nextProject}
          role="button"
          aria-label="Next project"
        >
          <ProjectCard
            project={projects[(currentProjectIndex + 1) % projects.length]}
            isActive={false}
            onImageClick={() => {}}
          />
        </div>
      </div>

      {/* 모바일/태블릿용 단일 카드 + 버튼 네비게이션 */}
      <div className="lg:hidden relative flex justify-center">
        <div className="w-full max-w-md mx-auto px-16">
          <ProjectCard
            project={projects[currentProjectIndex]}
            isActive={true}
            onImageClick={onImageClick}
          />
        </div>

        {/* 좌측 네비게이션 버튼 */}
        <button
          className="absolute left-1 top-1/2 -translate-y-1/2 h-10 w-10
                     rounded-full bg-white/95 dark:bg-gray-900/95 backdrop-blur-sm
                     shadow-lg hover:scale-110 transition-transform duration-200
                     flex items-center justify-center"
          onClick={prevProject}
          aria-label="Previous project"
        >
          <ChevronLeft className="h-5 w-5" />
        </button>

        {/* 우측 네비게이션 버튼 */}
        <button
          className="absolute right-1 top-1/2 -translate-y-1/2 h-10 w-10
                     rounded-full bg-white/95 dark:bg-gray-900/95 backdrop-blur-sm
                     shadow-lg hover:scale-110 transition-transform duration-200
                     flex items-center justify-center"
          onClick={nextProject}
          aria-label="Next project"
        >
          <ChevronRight className="h-5 w-5" />
        </button>
      </div>

      {/* 인디케이터 */}
      <Indicators />
    </div>
  );
}

// 프로젝트 카드 컴포넌트
interface ProjectCardProps {
  project: Project;
  isActive: boolean;
  onImageClick: (image: string) => void;
}

function ProjectCard({ project, isActive, onImageClick }: ProjectCardProps) {
  return (
    <div
      className={`bg-white dark:bg-gray-800 rounded-lg overflow-hidden
                  transition-all duration-500 ${
                    isActive ? "shadow-2xl" : "shadow-md"
                  }`}
    >
      {/* 이미지 영역 */}
      <div
        className="relative h-48 overflow-hidden cursor-pointer group"
        onClick={() => isActive && onImageClick(project.image)}
      >
        <img
          src={project.image}
          alt={project.title}
          className="w-full h-full object-cover transition-transform duration-300
                     group-hover:scale-110"
        />
        {isActive && (
          <div className="absolute inset-0 bg-black/0 group-hover:bg-black/20
                         transition-colors duration-300" />
        )}
      </div>

      {/* 콘텐츠 영역 */}
      <div className="p-6">
        <h3 className="text-xl font-bold mb-2">{project.title}</h3>
        <p className="text-gray-600 dark:text-gray-300 text-sm mb-4">
          {project.description}
        </p>

        {/* 기술 스택 */}
        <div className="flex flex-wrap gap-2 mb-4">
          {project.technologies.map((tech, index) => (
            <span
              key={index}
              className="px-2 py-1 text-xs bg-gray-100 dark:bg-gray-700
                        rounded-md"
            >
              {tech}
            </span>
          ))}
        </div>

        {/* 링크 버튼들 */}
        {isActive && (
          <div className="flex gap-3">
            {project.githubUrl && (
              <a
                href={project.githubUrl}
                target="_blank"
                rel="noopener noreferrer"
                className="text-sm text-blue-500 hover:text-blue-600
                          transition-colors"
              >

> [!NOTE] GitHub →
              </a>
            )}
            {project.liveUrl && (
              <a
                href={project.liveUrl}
                target="_blank"
                rel="noopener noreferrer"
                className="text-sm text-green-500 hover:text-green-600
                          transition-colors"
              >
                Live Demo →
              </a>
            )}
          </div>
        )}
      </div>
    </div>
  );
}
2. 3D 효과와 애니메이션
CSS Transform을 활용해 깊이감 있는 3D 효과를 구현했다. 중앙 카드는 원본 크기로, 양옆 카드는 축소하고 투명도를 조절해 자연스러운 원근감을 표현했다.
/* 사이드 카드 */
transform: scale(0.8);
opacity: 0.6;

/* 호버 시 */
opacity: 0.8;
transition: all 0.5s ease;
시각적 효과 구현
1. 그라디언트 텍스트
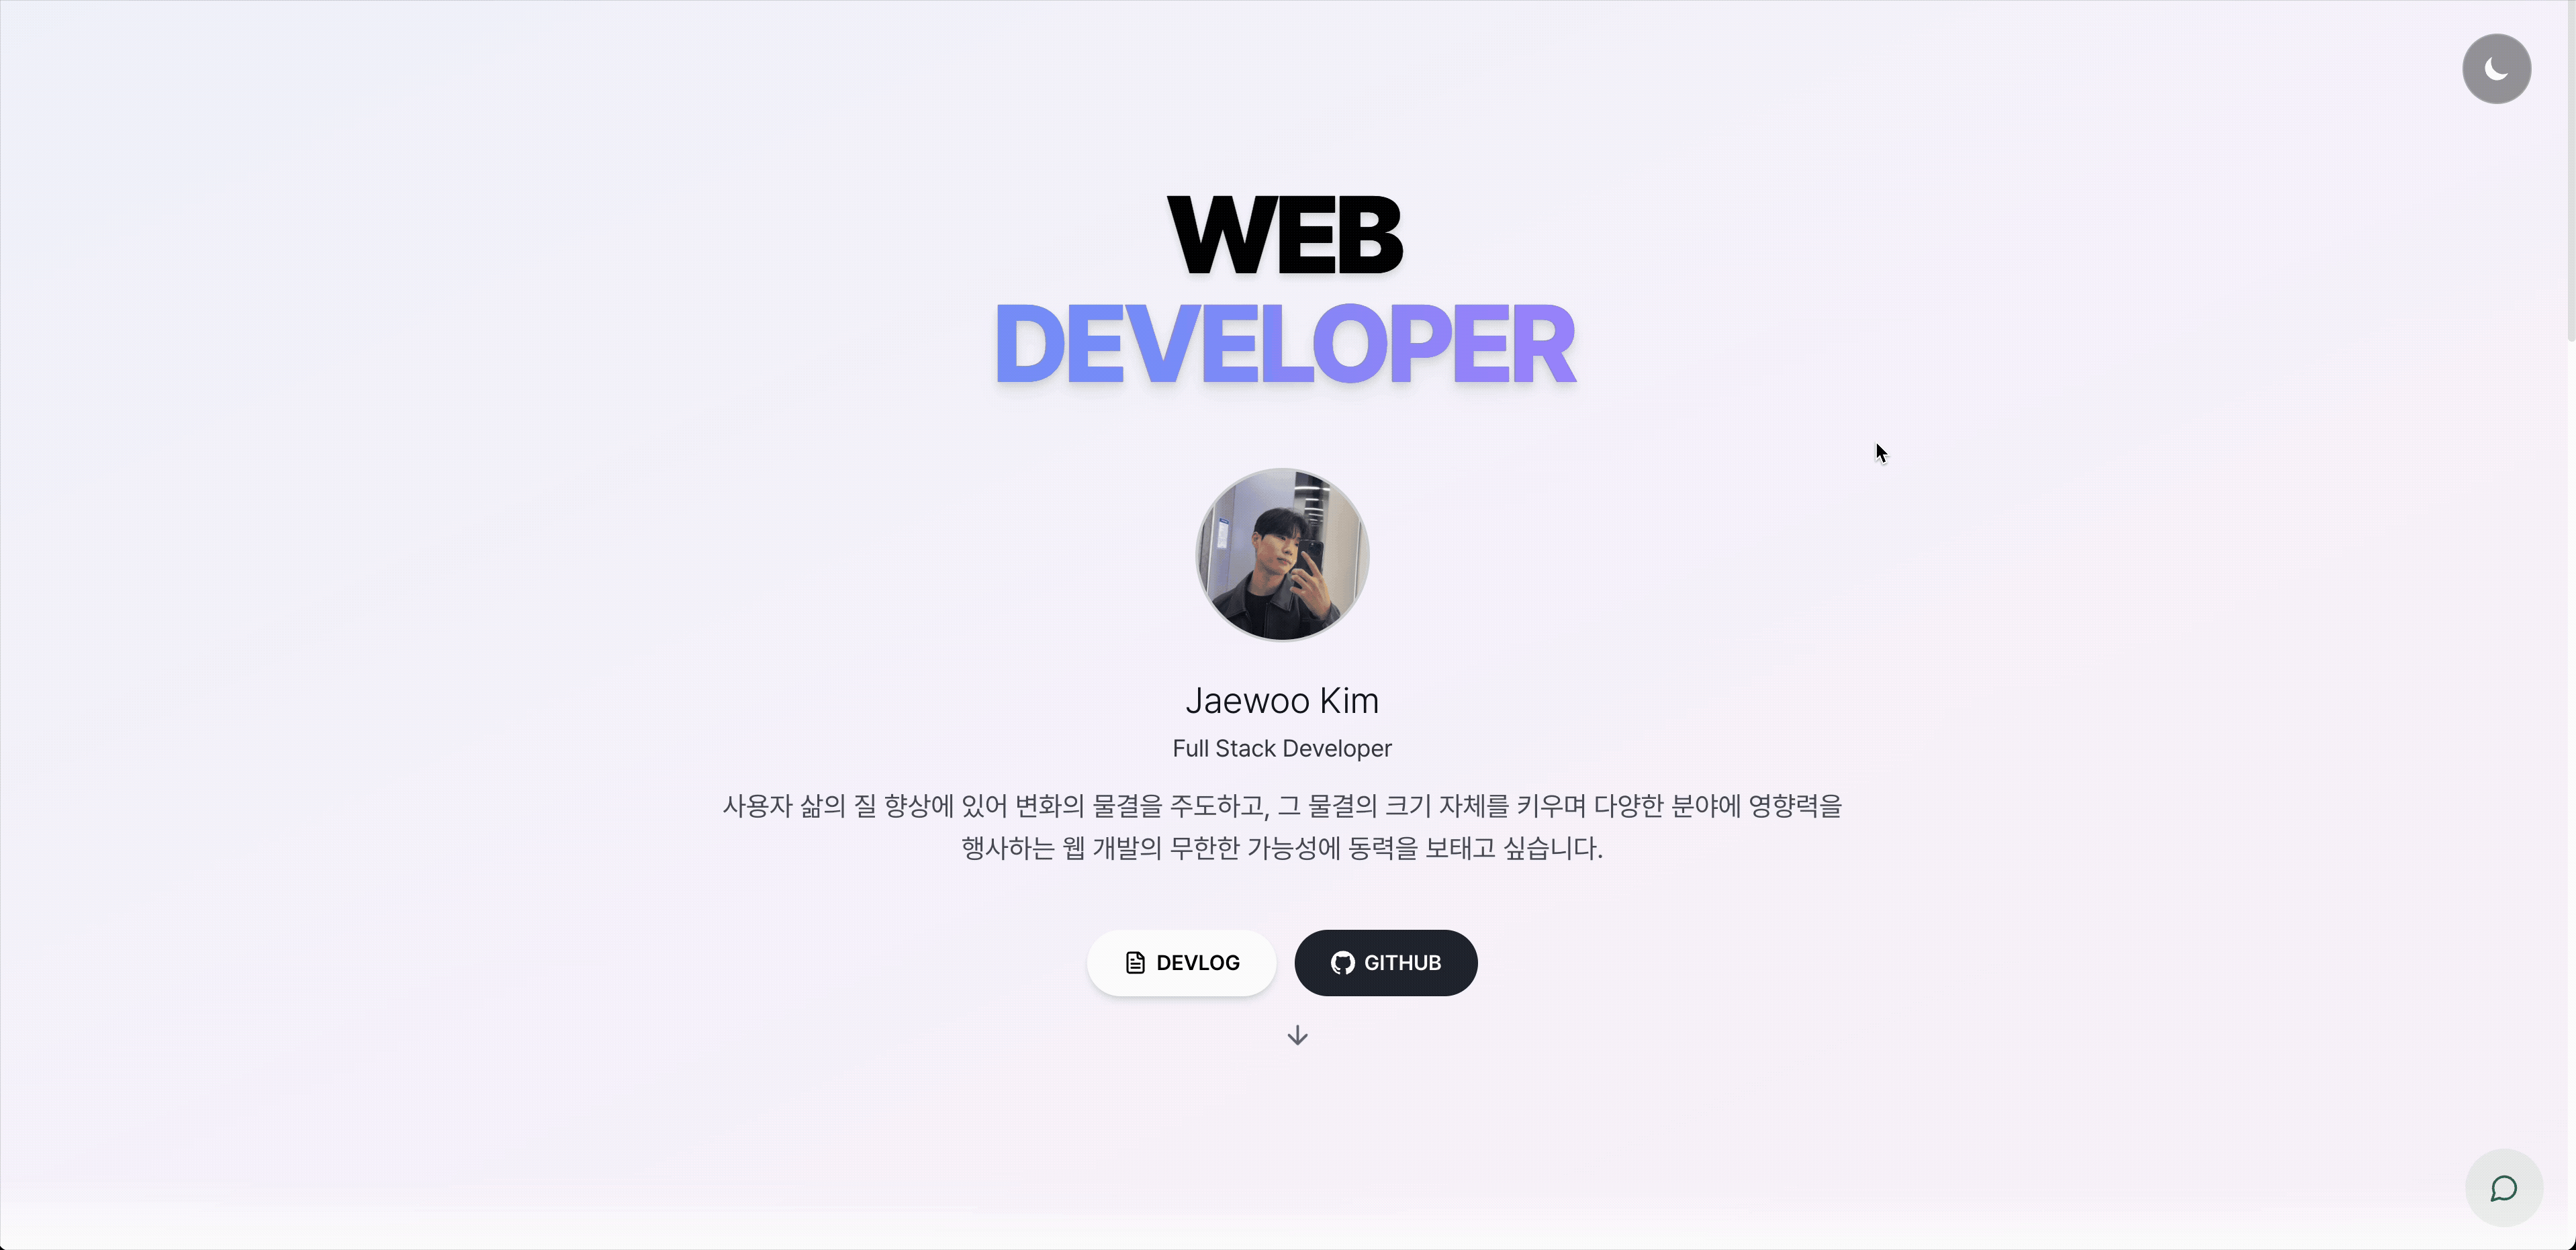
히어로 섹션의 타이틀에 그라디언트 효과를 적용했다.
import React from "react";

export default function HeroSection() {
  return (
    <section className="min-h-screen flex items-center justify-center">
      <div className="text-center">
        <h1 className="text-6xl md:text-8xl font-extrabold mb-6">
          <span className="bg-gradient-to-r from-blue-400 to-purple-400
                         bg-clip-text text-transparent drop-shadow-lg">
            DEVELOPER
          </span>
        </h1>

        <p className="text-xl md:text-2xl text-gray-600 dark:text-gray-300 mb-8">
          Creating Digital Experiences
        </p>

        {/* 스크롤 유도 애니메이션 */}
        <div className="absolute bottom-10 left-1/2 transform -translate-x-1/2">
          <div className="animate-bounce">
            <svg
              className="w-6 h-6 text-gray-400"
              fill="none"
              strokeLinecap="round"
              strokeLinejoin="round"
              strokeWidth="2"
              viewBox="0 0 24 24"
              stroke="currentColor"
            >
              <path d="M19 14l-7 7m0 0l-7-7m7 7V3"></path>
            </svg>
          </div>
        </div>
      </div>
    </section>
  );
}
2. 로딩 상태와 전환 효과
부드러운 전환을 위해 CSS 트랜지션과 애니메이션을 활용했다.
// 페이드인 애니메이션
const [mounted, setMounted] = useState(false);

useEffect(() => {
  setMounted(true);
}, []);

return (
  <div className={`transition-opacity duration-1000 ${
    mounted ? 'opacity-100' : 'opacity-0'
  }`}>
    {/* 콘텐츠 */}
  </div>
);
성능 최적화 전략
1. 이벤트 디바운싱
스크롤 이벤트는 매우 자주 발생하므로 디바운싱으로 성능을 최적화했다.
const scrollTimeoutRef = useRef<NodeJS.Timeout | null>(null);

if (scrollTimeoutRef.current) {
  clearTimeout(scrollTimeoutRef.current);
}

scrollTimeoutRef.current = setTimeout(() => {
  scrollToProjects();
}, 50);
2. 조건부 이벤트 리스너
필요한 경우에만 이벤트 리스너를 등록하고, 컴포넌트 언마운트 시 정리했다.
useEffect(() => {
  // 이벤트 리스너 등록
  window.addEventListener("wheel", handleWheel, { passive: false });

  // 클린업
  return () => {
    window.removeEventListener("wheel", handleWheel);
  };
}, [isScrolling]);
3. 하드웨어 가속 활용
CSS transform과 will-change 속성을 사용해 GPU 가속을 활용했다.
.carousel-card {
  will-change: transform, opacity;
  transform: translateZ(0); /* GPU 레이어 생성 */
}
접근성 고려사항
1. 키보드 네비게이션
마우스 없이도 모든 기능을 사용할 수 있도록 키보드 지원을 추가했다.
- 좌우 화살표로 프로젝트 전환
- Tab 키로 포커스 이동
- Enter 키로 선택
2. ARIA 레이블
스크린 리더 사용자를 위한 적절한 ARIA 레이블을 추가했다.
<button
  onClick={prevProject}
  aria-label="Previous project"
>
  <ChevronLeft className="h-5 w-5" />
</button>
3. 모션 감소 설정
@media (prefers-reduced-motion: reduce) {
  * {
    animation-duration: 0.01ms !important;
    animation-iteration-count: 1 !important;
    transition-duration: 0.01ms !important;
  }
}
결과
- 스크롤만으로 부드럽게 섹션이 전환된다
- 모든 디바이스에서 최적화된 인터페이스를 제공한다
반응형 디자인, 성능 최적화, 접근성까지 모두 고려하면서도 시각적으로 매력적인 인터페이스를 구현하는 과정이 재미있었고, 동시에 값진 경험이었다.
이 프로젝트의 모든 소스 코드는 GitHub에 공개되어 있습니다. 코드 품질 개선이나 새로운 기능 제안에 대한 피드백은 언제나 환영합니다.